DIY Painted Bathroom Countertop and Sink
Please note that this post contains affiliate links. As an Amazon Associate, Rewards Style influencer and Jane Influencer, we earn from qualifying purchases and any sales made through such links will reward us a small commission – at no extra cost for you.
Everything you need to know about my DIY painted bathroom countertop and sink.
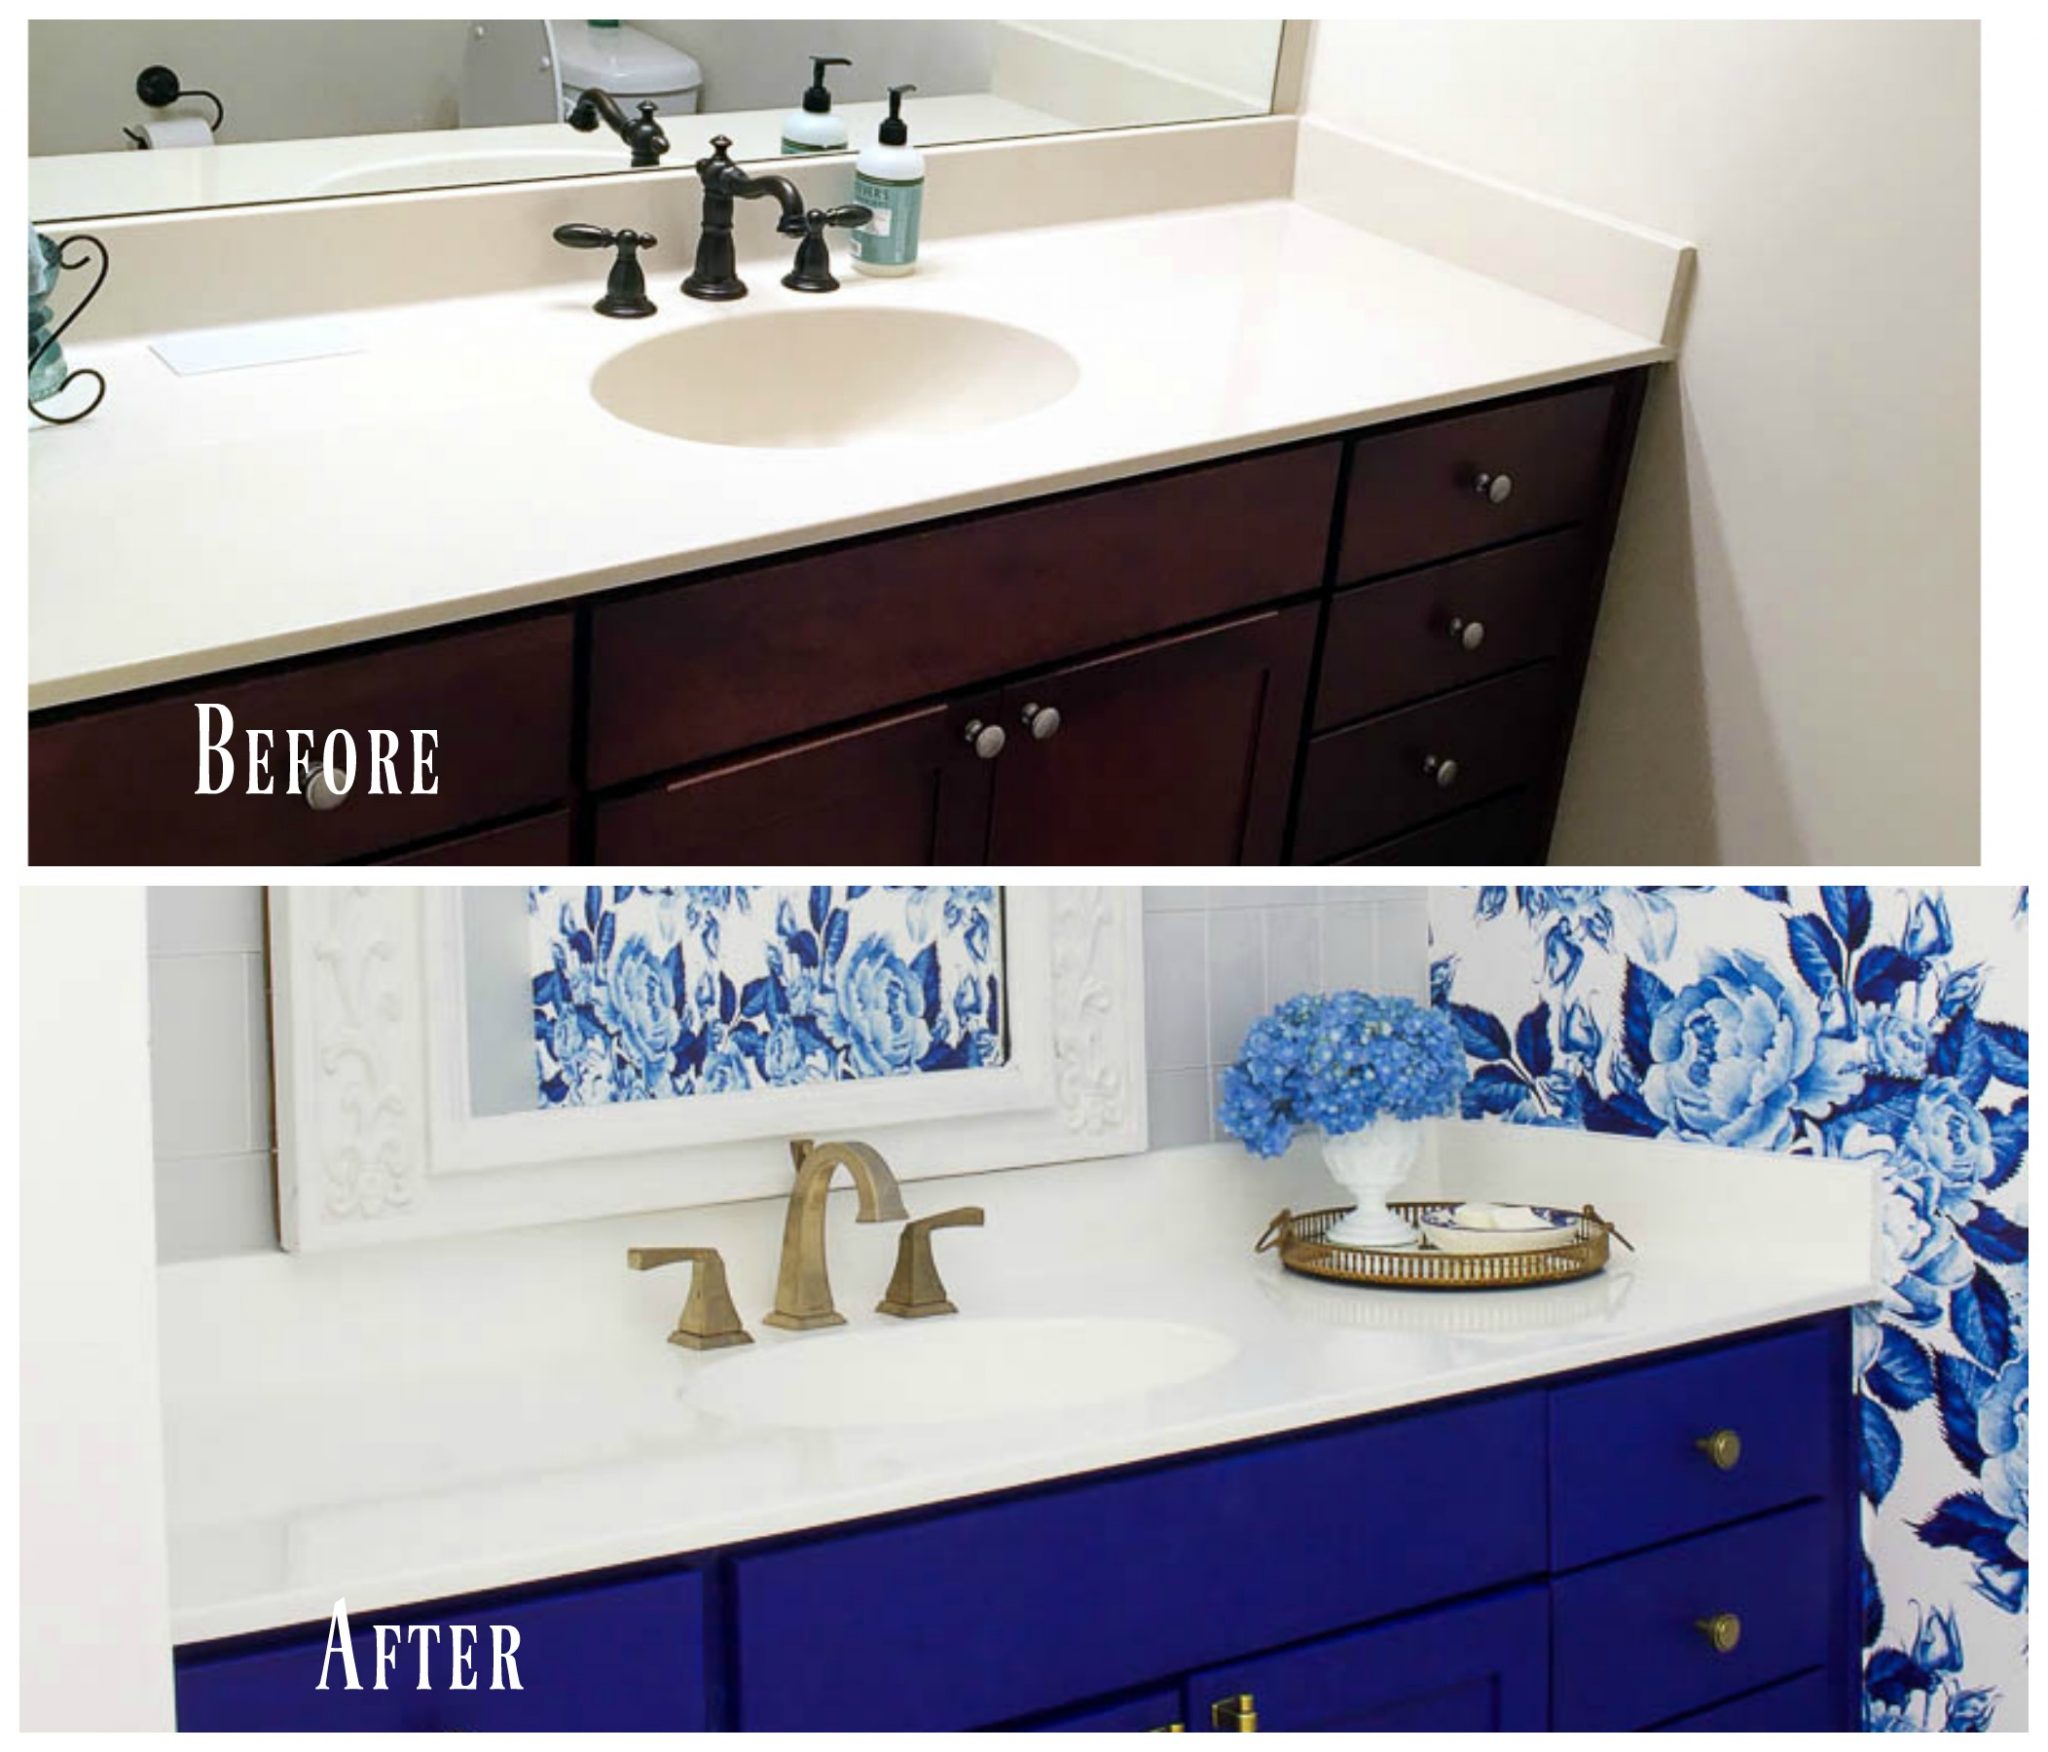
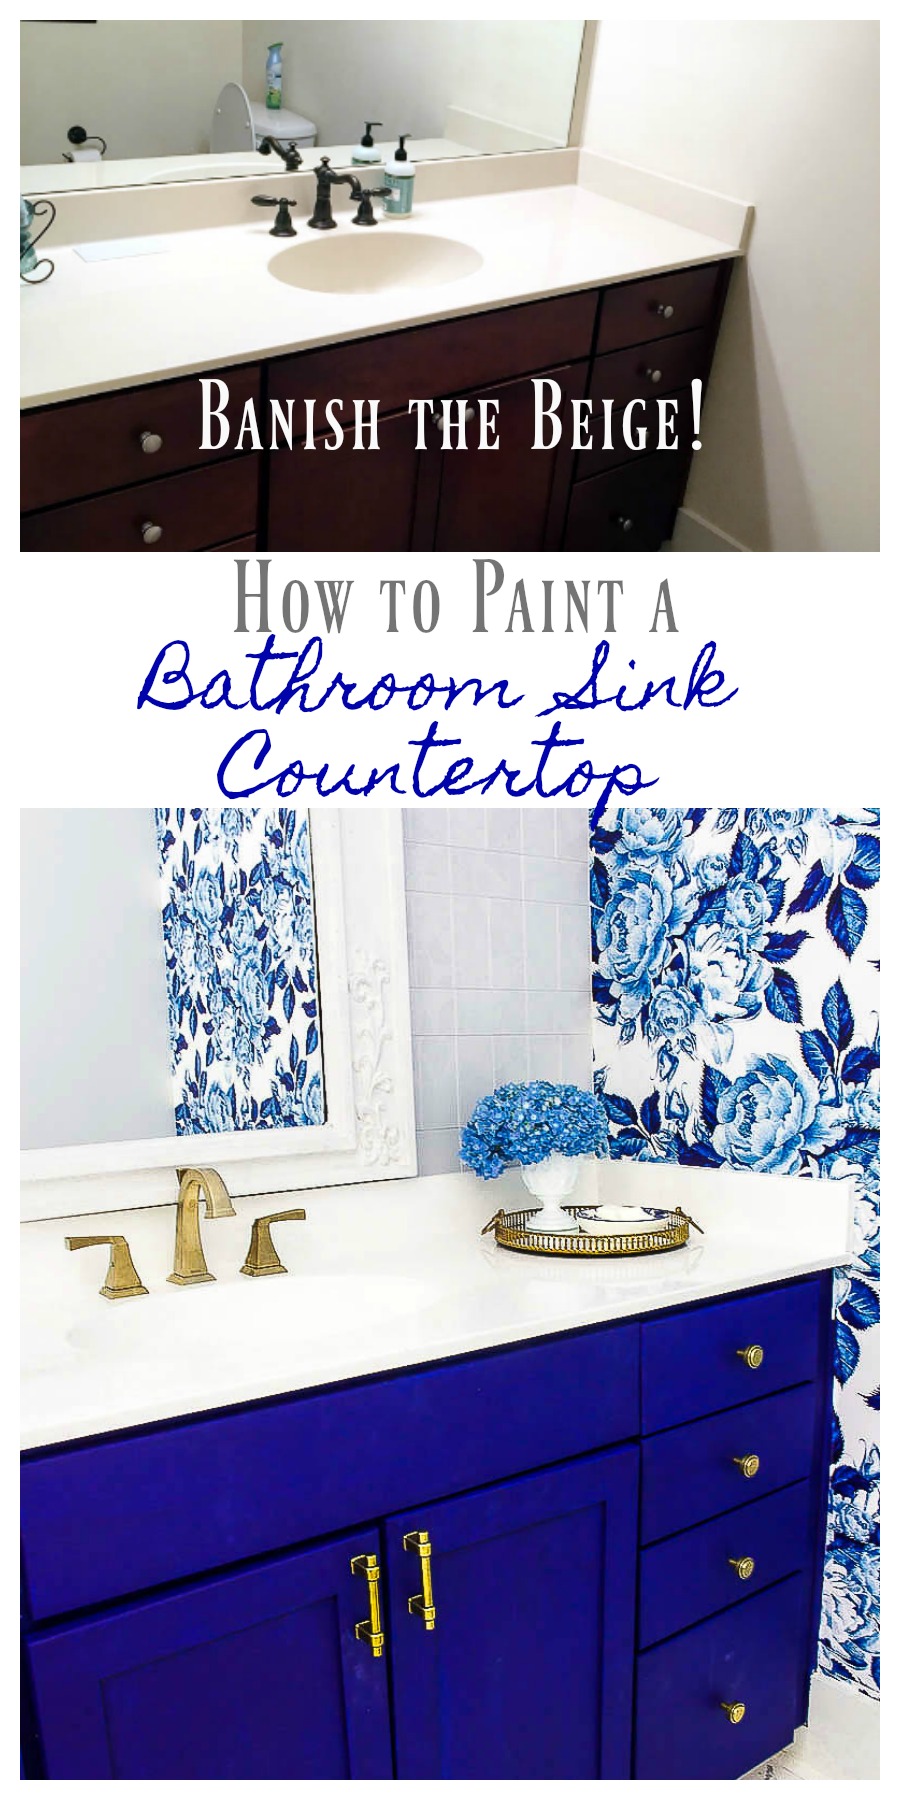
If you are a new visitor to 2 Bees in a Pod, I recently completed a a full bathroom makeover on a budget. Every single surface was transformed, except the bathtub. One of the biggest transformations and most cost effective projects was the countertop and sink. The existing countertop was 64″ and not a standard size. Replacing the countertop was too expensive and not in the current budget. After doing a lot of research and asking a ton of questions I came up with a solution. A DIY painted bathroom countertop and sink was my answer. Here’s all the details sharing before and after photos, with pros and cons to this project.
In the Beginning
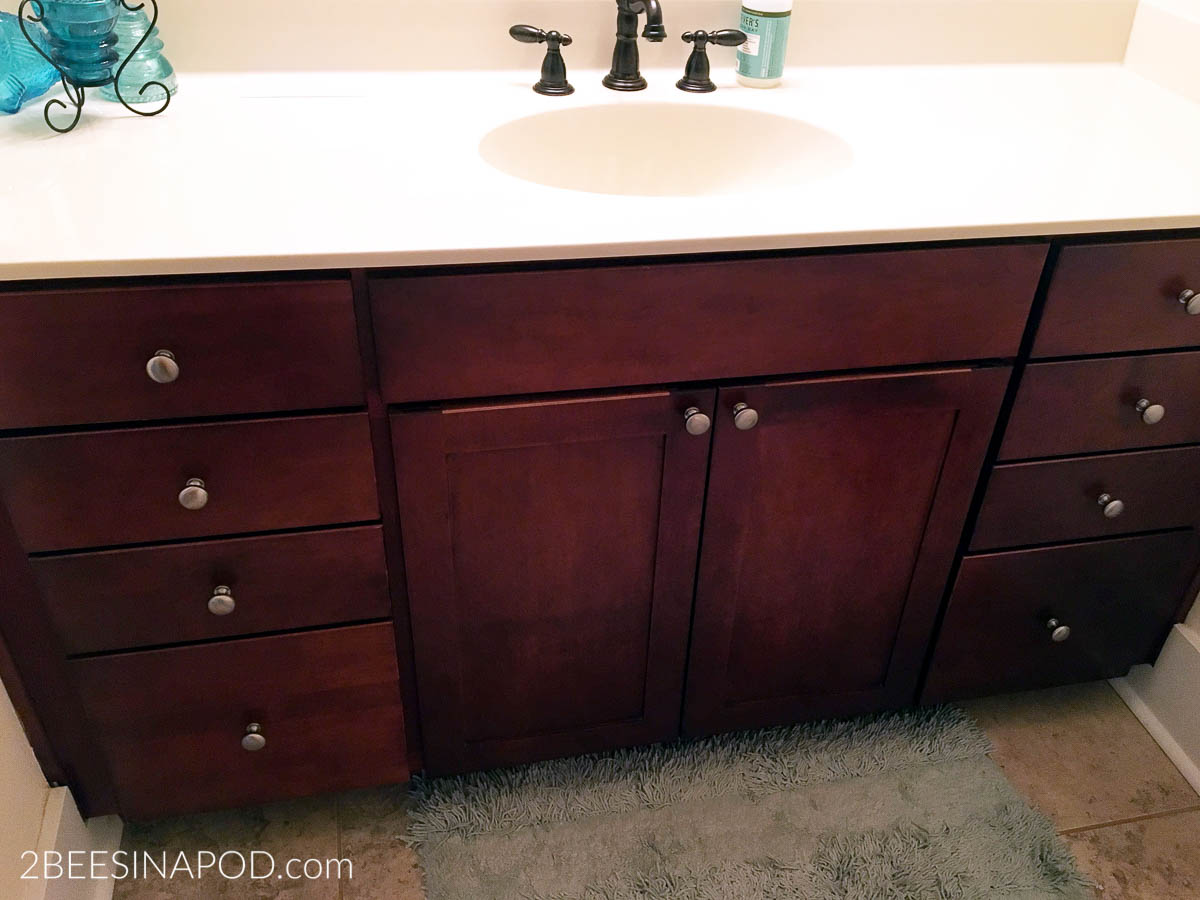
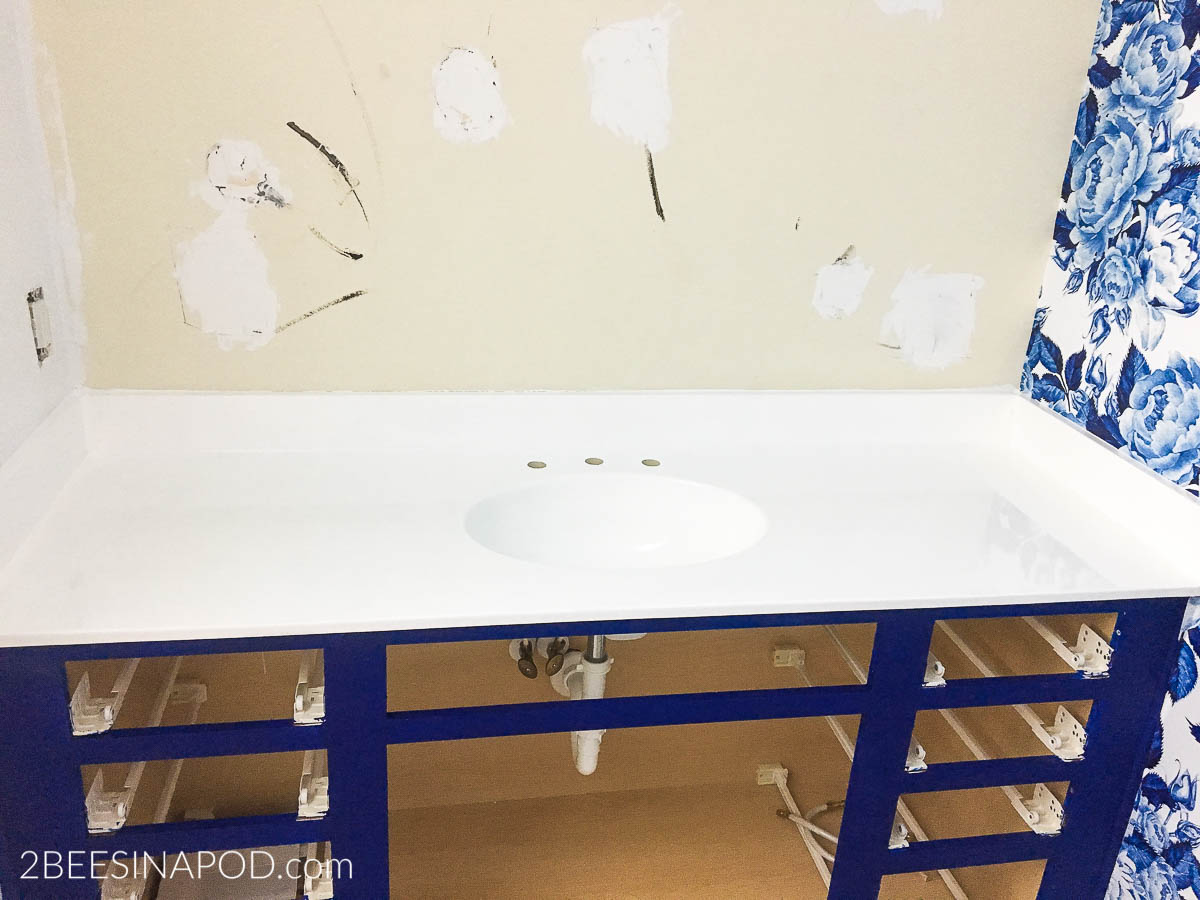
When the makeover began, this is what the vanity looked like. Not terrible by any means. The truth of the matter was I needed a big change in my home decor world. My previous home of 14 years had bathrooms that looked almost exactly like this one. Honey Bee and I have owned this vacation home for 11 years and since we downsized and sold our previous home this is now our full-time home for two years. All of the brown and beige was just too much. Plus this bathroom doesn’t have a window which adds even more darkness. These are a lot of words to say…I desperately wanted a bright white countertop and sink!
Even More Obvious
Once Jenn added this gorgeous blue and white removable wallpaper feature wall, the beigey-yellowness of the countertop became even more apparent. It had to go – STAT!
Research and Homework
Once I accepted the fact that I could not afford a new countertop, I had to find another solution. After doing tons of online research I narrowed it down to two products for painting countertops.
- Side-by-side product comparison
- Read consumer and customer reviews and testimonials
- Took positive and negative consumer comments of each product into consideration
- Made phone calls to each company to ask product questions
The Chosen One
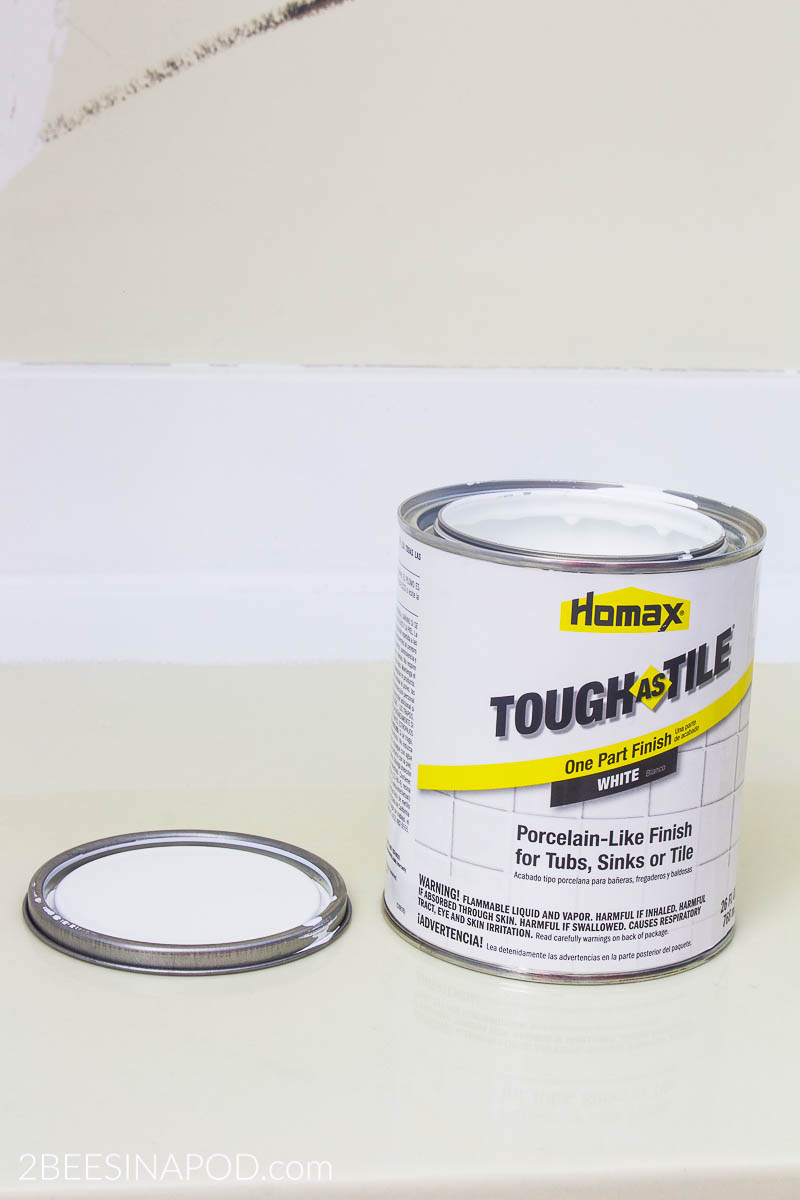
After all of the above considerations I chose Homax® Tough as Tile® brush-on method in white finish.

Supplies Needed:
- Homeax Tough as Tile kit
-
Nitrile rubber gloves – included in the kit
-
#000 grade steel wool sandpaper – included in the kit
• Surface preparation cleaner (such as TSP/TSP alternative)
• Clean lint free cloths
• Sponge
• Abrasive sponge
• Lacquer thinner for clean-up
• Bucket
• Comet cleaner
• Isopropyl alcohol
• Hard water remover
• Bleach
• (2) Stir sticks
• ¼” Nap SHED FREE 4″ paint roller with(3) roller covers OR
• (2) 2″- 3″ Polyester paint brushes
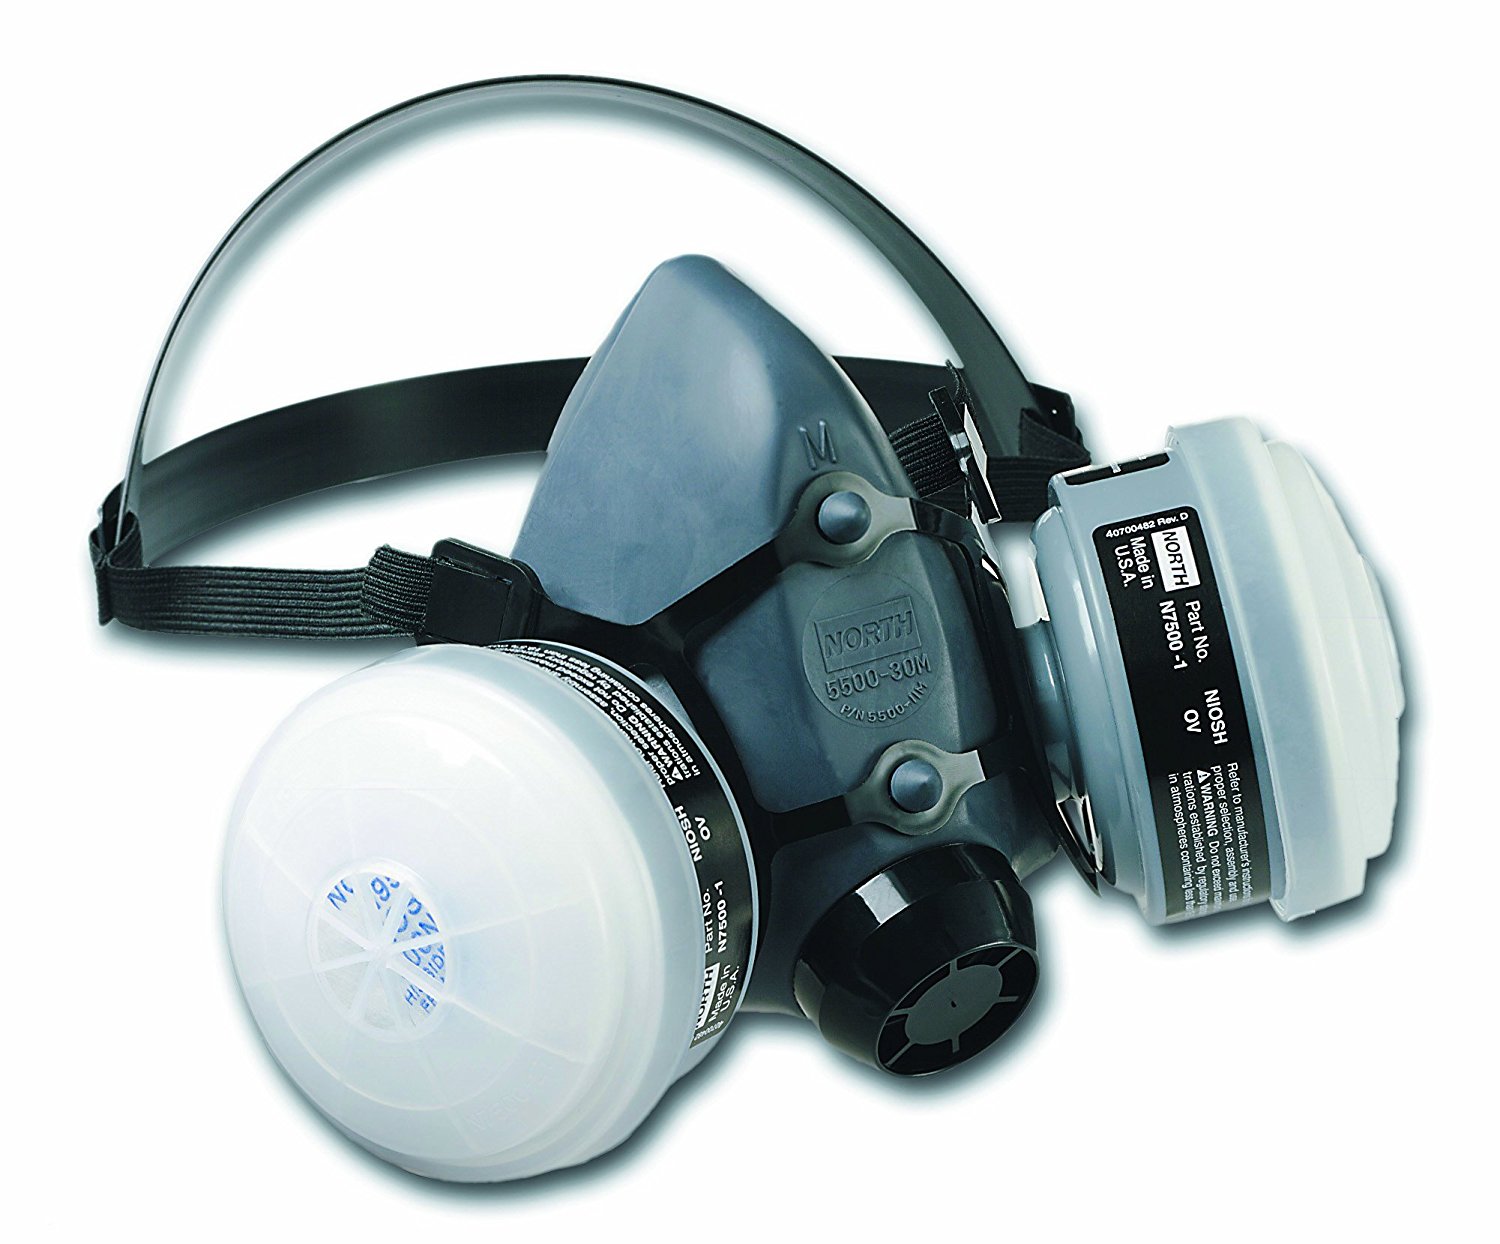
• Respirator (NIOSH approved – organic vapor) DO NOT attempt this project without this!
Read All Directions Carefully
Included inside the box are lengthy directions. Read them very thoroughly and carefully. Again and again. I started to freak myself out – thinking that this might be a complex process. Calling in reinforcements by way of my favorite painter, Victor for assistance and reassurance. Victor has done lots of projects for me in the past and I trust him implicitly. He explained that he had never done a project like this before, but was eager to to try. We agreed to do the project together.
-
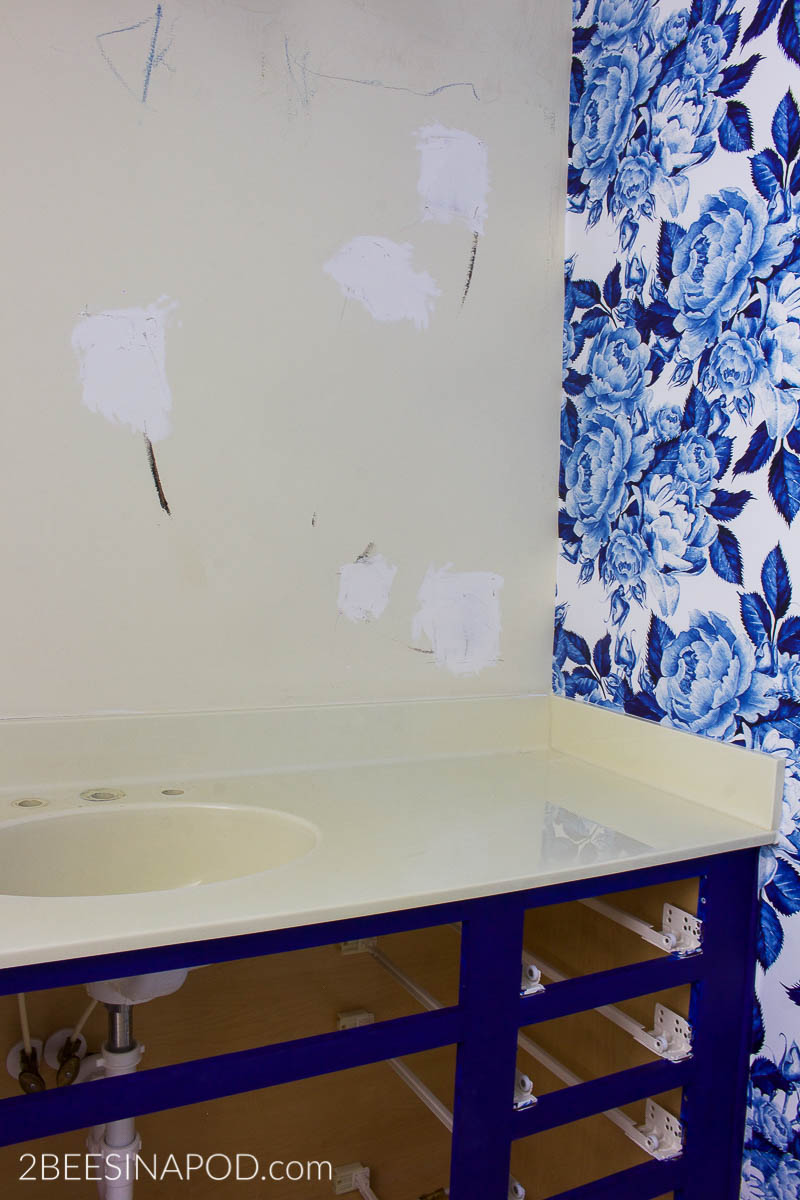
Using the 3-in-1 tool, I removed all of the old silicone caulk, trying to remove every single bit. For remaining caulk residue, I wiped down the grooves of the countertop edges with the lacquer thinner.
- Clean the countertop like nobody’s business. Using an abrasive cleaning sponge and Comet cleaner scrub every surface, nook and cranny. Rinse with clean water and dry well with a lint free rag.
- Making absolutely sure that all residue was removed, I sprayed the countertop again using Lime Away and used another clean lint free rag to wipe and dry.
- Scour the entire surface area with #000 grade steel wool (included with the kit) using a small circular motion. This will allow for abrasion to occur resulting in proper adhesion. If steel wool has deposited a dark surface, it is an indicator that a residue remains. Keep going. Luckily for me there was no dark surface.
- Next, I used lacquer thinner to make sure the countertop was absolutely spotless! It is also important that the countertop surface is 100% DRY!I waited until the next day to begin painting.
- Typically the next step is protection. Taping off walls, tarps on the floor, etc. Being that I was painting the walls and tile floor and the mirror was removed I was able to skip this step. Honey Bee did however remove the existing faucet and handles for me.
- Make sure the room temperature is maintained 70°-80° at all times. Humidity is supposed to remain under 80%. In all honesty I had no way of checking this. I figured I was indoors with my air conditioning running – that was the best that I could do.
- Do NOT shake the can. Gently stir only. You do not want any air bubbles to be in this paint product because ultimately they will be on your countertop.
- Victor and I worked with a brush and a roller simultaneously. We agreed that the roller worked best for the first coat. Always maintain a wet edge. You need to work with a light hand and you need to work quickly. This product starts to dry the minute that you apply it. Do not try to get full coverage in the first coat it will be streaky – don’t panic. DO NOT attempt to repeat painting over previously painted surfaces after 2 minutes of application.
- Remember to use new brush and/or roller for each new coat. Let the first coat dry for 3 hours but no more than 6. **Read my disclosure below**
- Apply second coat using same method. We used only a brush. If a third coat is needed repeat step 10.
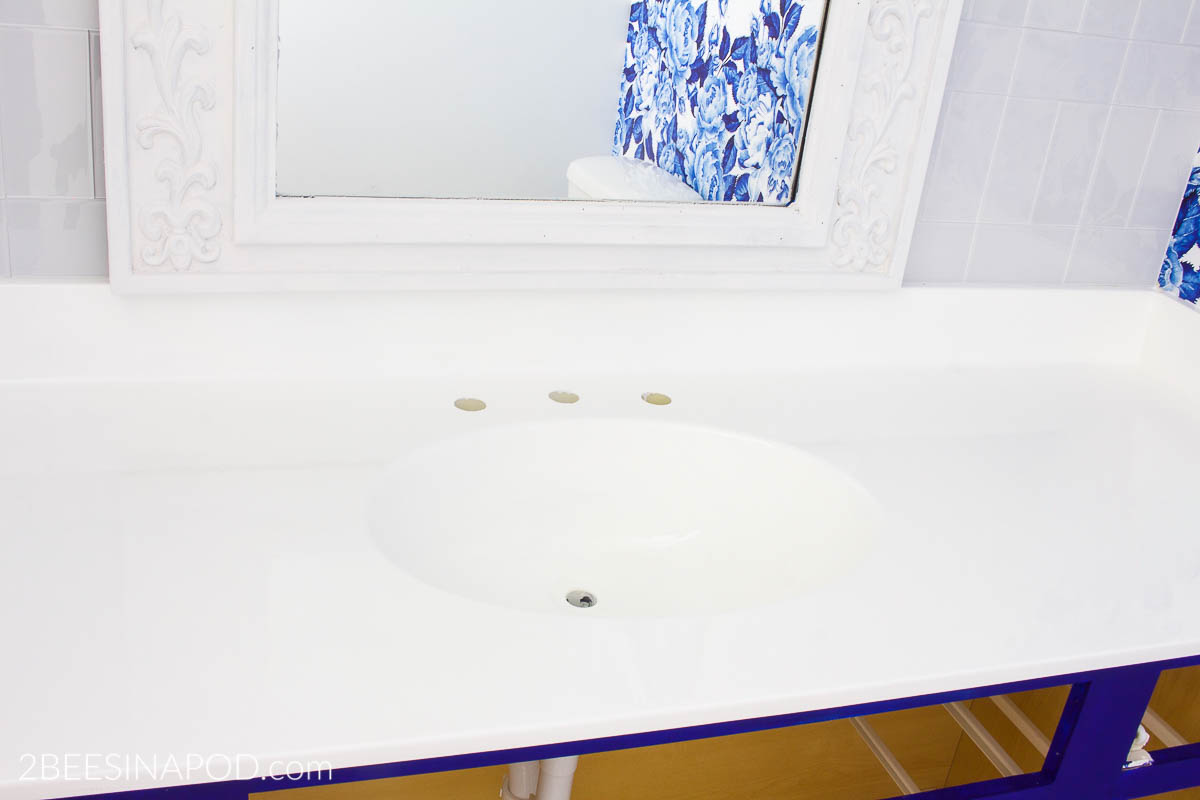
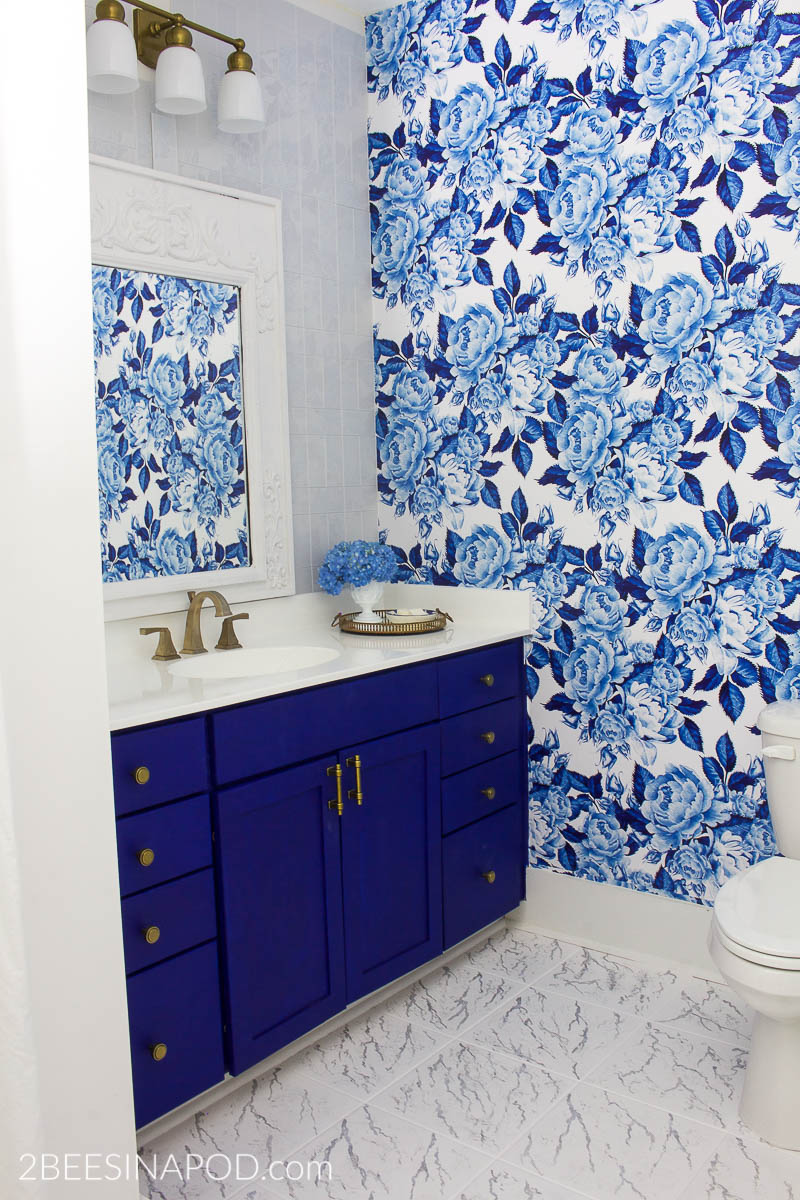
Here you can clearly see the big difference in the countertop color with the new paint finish.

**Disclosure Information** I felt like I had read the directions for this product a million times. In my defense, included in the same package are the directions for the spray-on method and several foreign language pages. Well, I totally missed the part about “no more than 6 hours” after the first coat being painted.
So, the next morning Victor returns so that he and I can start on the second coat and just for good measure I re-read the directions and I read out loud the “6 hour” part. Needless to say we both just about lost our breakfast. I called the Homeax Hotline number and was asked some pertinent product information, particularly “what time did you paint the first coat on your countertop”? Technically Victor and I had 30 minutes to get my countertop completed. You talk about panic mode. Thank goodness he and I work very well together!
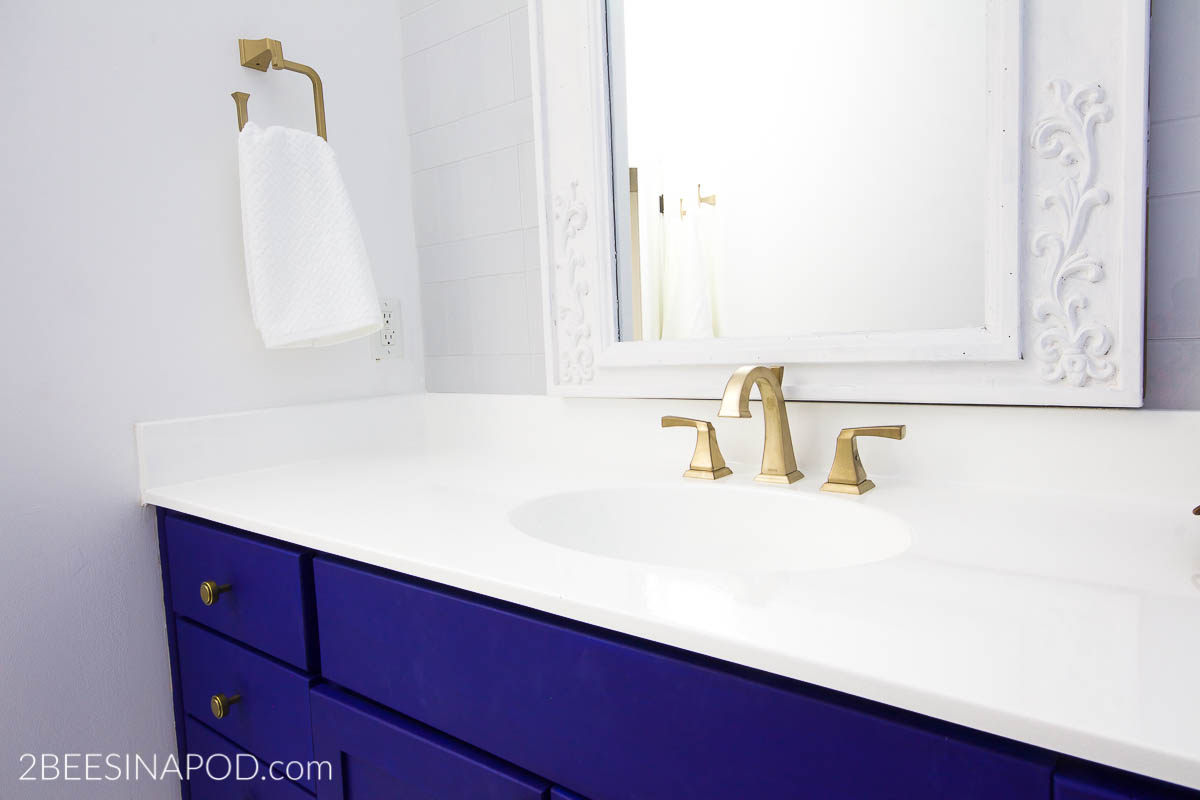
Because this was the end result:
TOTALLY WORTH IT
Swoon worthy

I still can’t believe that this is my guest bathroom!
PROS:
- Super cost effective – At just $28 my countertop looks brand new glossy white
- Fairly easy DIY project
- Product is readily available at most hardware stores
- The 800 phone number is very helpful before and during this project
CONS:
- Very noxious and you need to wear a mask. You may even need to leave your home. We didn’t think the fumes were bad at all. After painting, we just closed the bathroom door.
- Directions are very lengthy and need to be read and re-read
- Must be patient and follow the directions to the letter or the product will not work
- Starts drying as soon as it is applied so you can’t go over mistakes
- Lots of prep and cleaning – but definitely worth it
All-in-all – I would definitely do this project again. I mean, I would love to be able to afford brand new quartz countertops. But – I am thrilled that this alternative is available and that it is so inexpensive. If you have any questions about my DIY Painted Bathroom Countertop and Sink leave a comment below and I will do my best to answer you. Also, I plan to update this post as time passes to let you know how the countertop is holding up!
Don’t forget to Pin this to your favorite Pinterest board!


Love this! I’ve previously used counter top paint from Lowe’s on an old pink Formica top in a powder room. It worked really well. Didn’t know there was an option for a sink bowl. This looks fabulous!!! Thanks for sharing details, going to try in our new hone in Maryland.
This bathroom is one of my favorite makeovers of yours to date. I literally cannot get over how much different this space looks and how much hard work you put into making it amazing. We have laminate countertops in a few of the bathrooms and I would love to redo them with something like this. Thanks so much for taking all of the guesswork out of a big project like this for us. On a side, any tips you can give us for getting someone on board to repaint the bathroom cabinets at Loblolly would be greatly appreciated ha ha. Lots of love and SO proud of you – its next level amazing – CoCo
Is your vanity countertop laminate or cultured marble?
I really love the shower curtain! Where is it from?
did you remove your drain valve as well?
Hi –
Yes, we did remove the drain valve as we were replacing our hardware. Depending on how neat you are with painting, you could possibly tape the metal very, very well to make it seal-tight. This project was definitely easier for us with the drain valve removed.
Let us know how it goes!
Vicki and Jenn ~ 2 Bees
Your bathroom turned out absolutely gorgeous! I have 2 questions. What do you clean the countertops and sink with and how are they holding up??
Hi Megan – Thank you so much! Please keep in mind that this painted countertop is in a guest bathroom – so, not as much wear-and-tear as a master bath. With that being said – after a year there are no nicks, scratches or blemishes. We clean with Mrs. Meyer’s countertop cleaner in whatever fragrance we love at the moment. LOL The countertop is still perfect. Also, we do have a lot of weekly guests that use this sink as well as monthly overnight guests.
We hope that this helps. If you have any other questions, please don’t hesitate to ask!
Vicki and Jenn ~ The Bees
Can you tell me the information for the blue paint you used and the brand of the gorgeous wallpaper..
I want to paint our bathroom counter tops, however the sinks are fitted in separately and are already white porcelain. The counters are laminate. Is the product that you used suitable for laminate?
KJ
How did y’all redo the flooring in the guest bath? I noticed the difference in the before and after pictures.
I must have the color on those cabinets! Def inspired me to redo my bathroom! Love love love it!!!
You did a really great job! I need to save money to redo my own bathroom next year!
What color blue are the cabinets?
I love the navy blue color. I just like the paint you have done in your bathroom. I recently painted my bathroom with a brown color. I wish i have chosen this color. But when I will repaint it I am gonna use the same color. Thanks!!