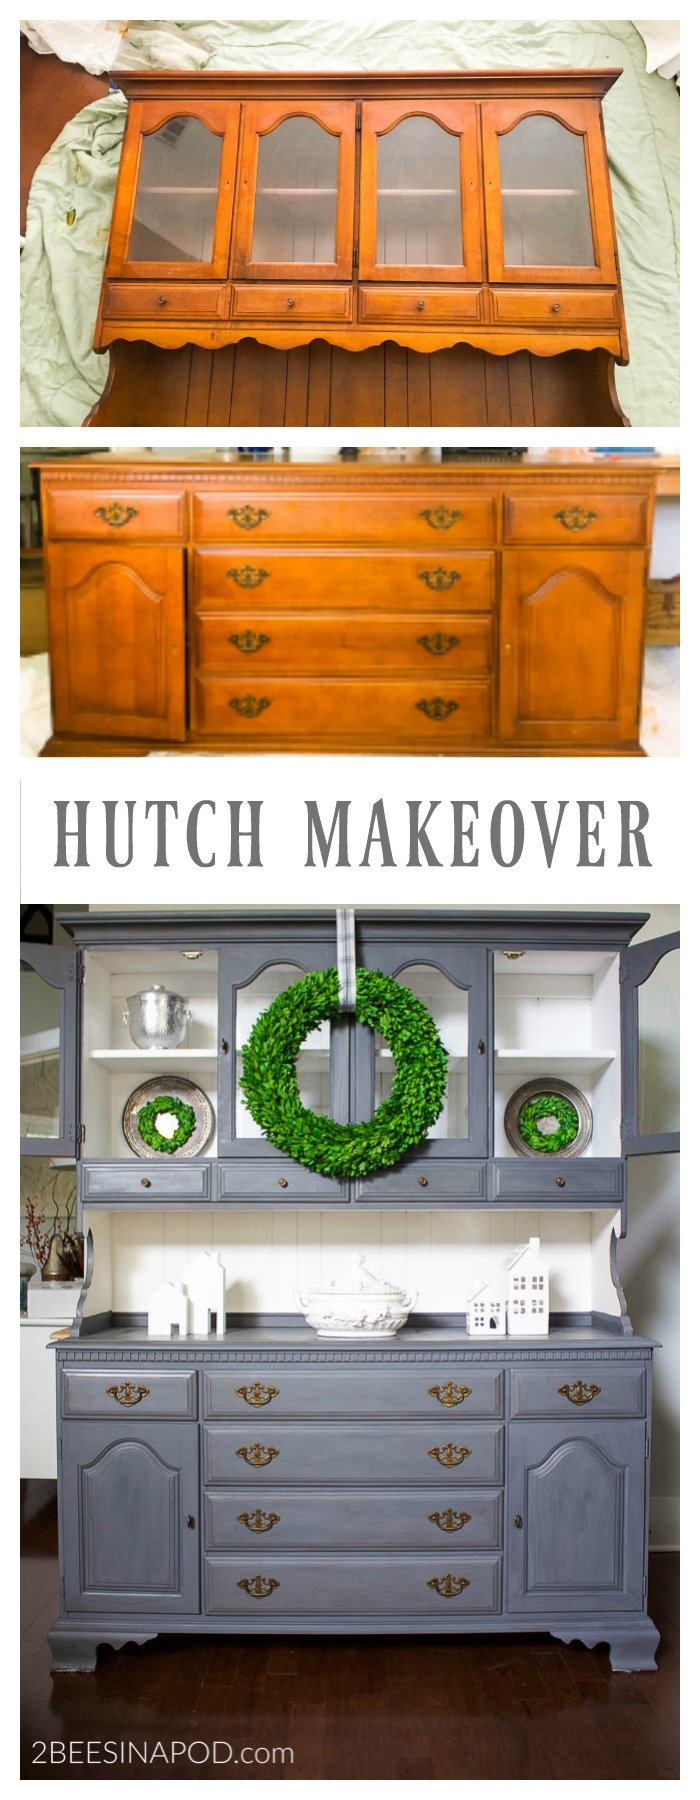
Gray Painted Hutch Makeover That Made Me Cry
Please note that this post contains affiliate links. As an Amazon Associate, Rewards Style influencer and Jane Influencer, we earn from qualifying purchases and any sales made through such links will reward us a small commission – at no extra cost for you.
You know how much I love furniture makeovers and transformations. Well, I almost quit painting altogether because of this gray painted hutch makeover.
It’s not often that I whine and complain about our projects. Especially when it comes to painted furniture makeovers. The power of paint with the magic of a paintbrush creates wonders of beauty on a thrifted or damaged piece of furniture. My favorite moment after a painted furniture makeover is when I turn around, transformation complete, it’s like a Cinderella moment. Sometimes I myself can’t believe how gorgeous a piece turned out. With this gray painted hutch makeover it tested everything – my skills, expertise, patience, resolve and more. Who knew a piece of furniture could do that?
It all started at the thrift store
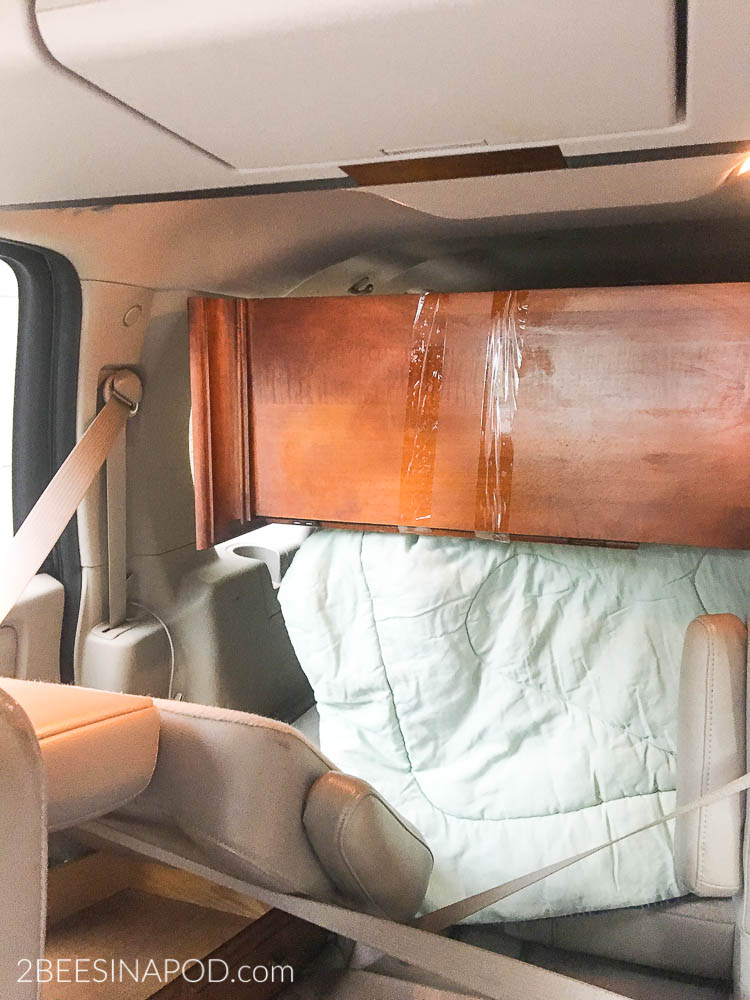
Doesn’t it always start at the thrift store? LOL Way back in August my friend Liz came to visit from Mississippi. I love it when she comes to town. Liz and I meet up in Atlanta and we do the thrift store pilgrimage. We travel to thrift stores, estates sales and antique shops looking for great deals. Typically we each find treasures that we just can’t pass up. On this particular day I found a large hutch for just $70 that I knew would be perfect for my antiques booth. Of course I forgot to take a photo of it in the thrift store. Here it is crammed into my vehicle after it was dismantled. It was touch and go for quite awhile as this beast was initially not fitting into my giant SUV. Thanks to Liz and her packing skills the hutch was finally ready for the ride home.
After I got home
Once I got home it became evident that Honey Bee and I needed help getting this out of the SUV. Our friend Scott came to the rescue and the hutch was moved to the garage. Then, as luck would have it our summer temps hit record highs and there was no way that I was going to be painting outside in 98+ degree weather. Which in my defense isn’t ideal painting weather either. So the hutch sat in the garage as I got busy with other projects and the schedule of every day life.
Painting Day
When I was finally ready to paint it was the end of October and it was now too cold to paint outside. I somehow convinced Honey Bee to let me paint this crazy piece inside our tiny foyer area. After rigging up a way to help easily get it in the house I was ready to get to work.
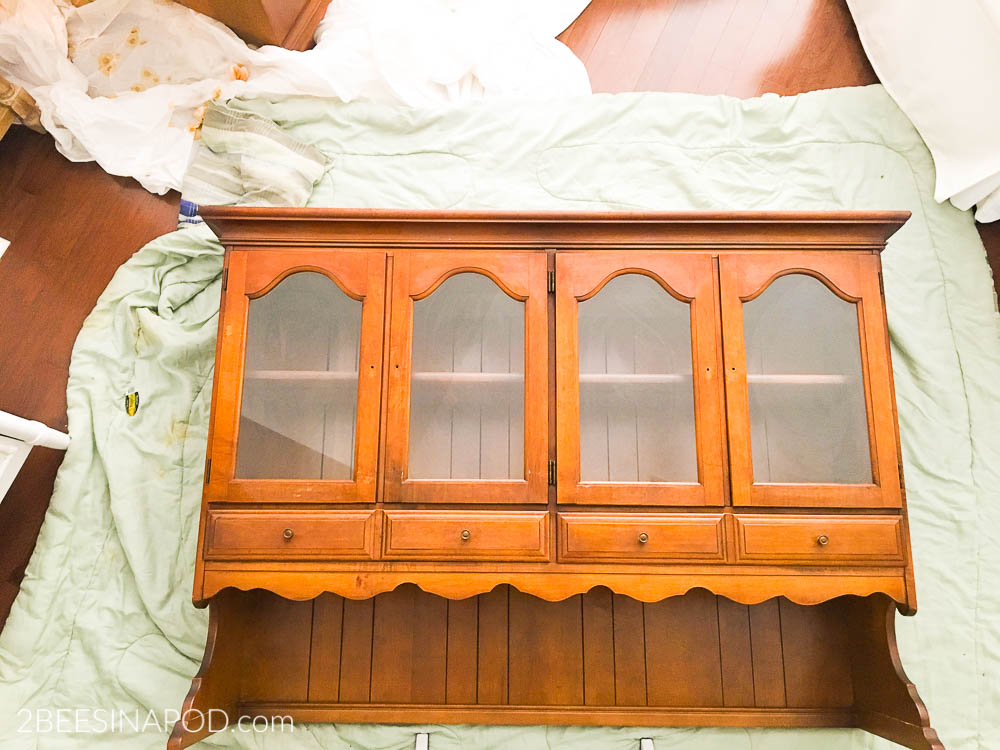
I hate that I don’t have photos of this hutch put together before it was painted. Suffice it to say that this thing is super heavy. Dare I say that the top is just as heavy as the bottom, so there so there was no way that we could keep lifting it up and down just for the sake of photos. It’s that kind of heavy.
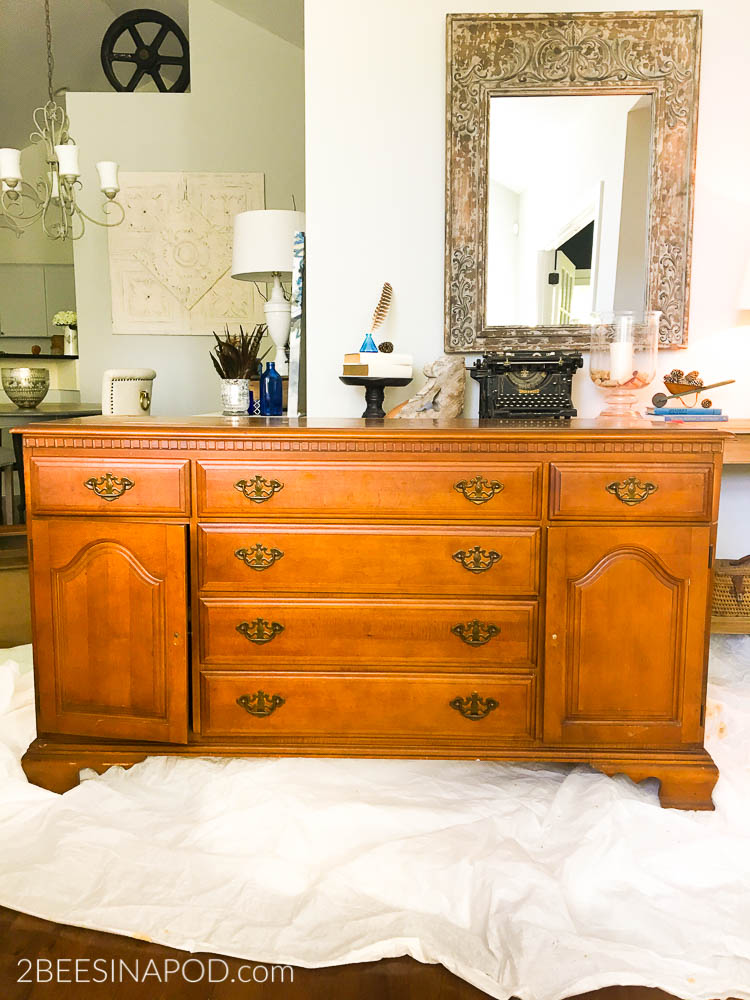
In reality this furniture looked even more orange close-up. Also, all of these photos were taken with my iPhone as I was in a hurry and as I mentioned this piece was for my booth. The wavy piece of wood under glass drawers was removed. I felt this made the hutch look too country.
Cue the violins
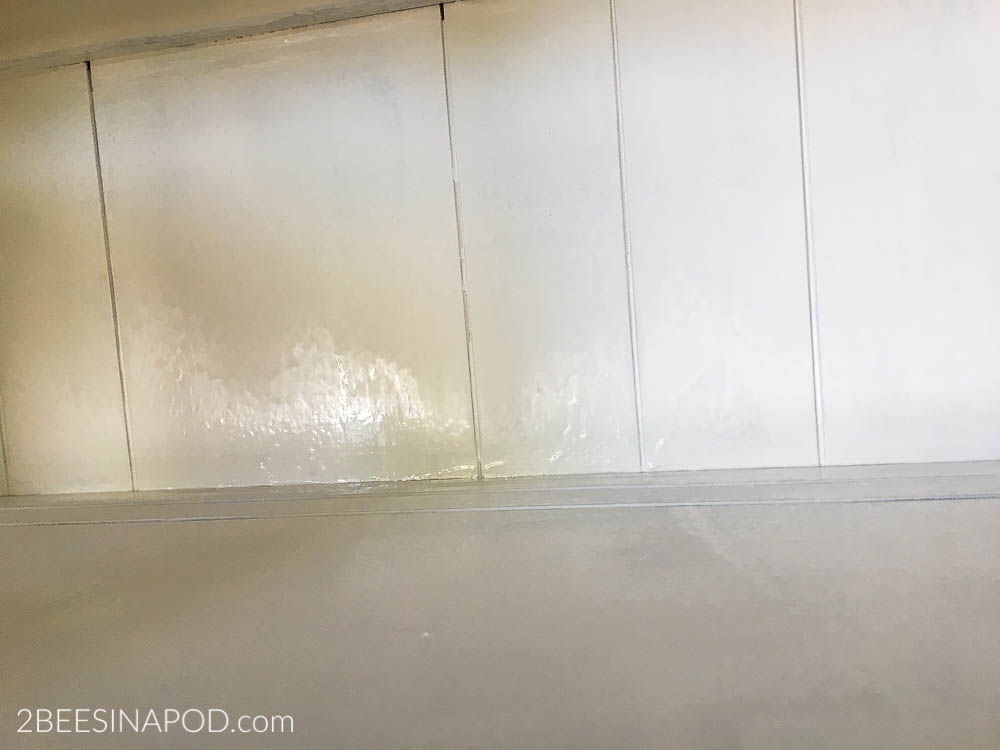
Here’s where the drama started. Jenn and I have been painting furniture for a very long time. Even before furniture paint was readily available. We always follow our own guidelines of 5 Things to Do Before You Paint a Piece of Furniture. The most important thing to do before painting is cleaning the piece of furniture. The bottom of the hutch was no problem at all. But the top…OhMyWord! I used my trusty TSP mixture and lint free cloths and began cleaning. The rags immediately turned bright orange and kept turning orange.
In the photos below – these rags looked like this after 3 hours of cleaning!! 3 hours!!!
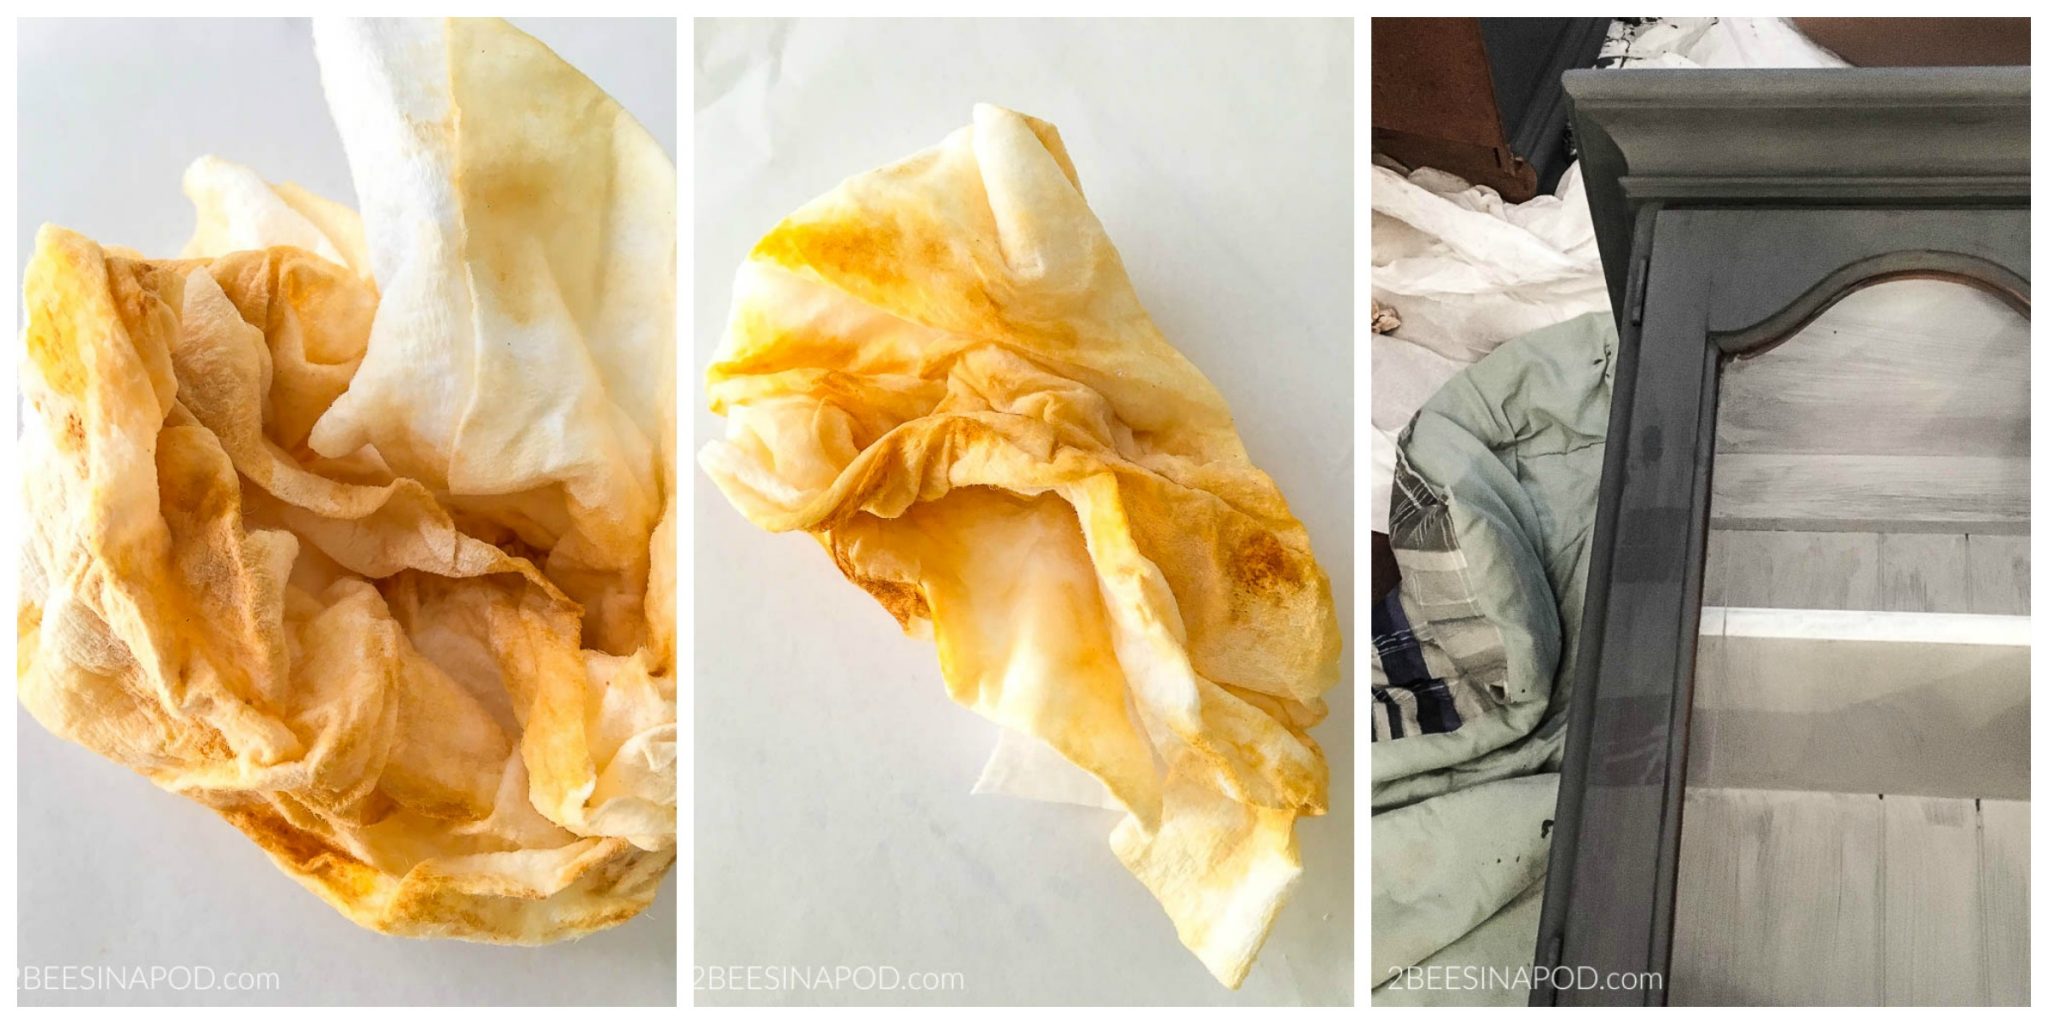
Just 3 hours on the top piece of the hutch. I kept wiping, scrubbing, re-reading cleaning directions, having dark thoughts involving matches 🙂 At this point I was so frustrated that I had my first cry. I don’t know why the top piece was like this and the bottom portion was not. It seemed like maybe the upper portion of the hutch had been shrink-wrapped or dipped in frying grease or God-knows-what.
Moving on
At this point I made the decision to move ahead. Otherwise I would still be there cleaning, I am certain of it. Plus, time was of the essence. Our antiques booth was moving to a new building location and Honey Bee and I were leaving town. So, I had a total of 3 days to complete this project beginning to end. No problem at all for me. Typically I can finish a furniture makeover in less than a day like this chalk painted aubusson armoire or the white painted sideboard for the dining room. So, I broke out my favorite trusty Zinsser Gold Primer to seal in whatever was happening with the top of this hutch.
Except, that didn’t even work. And I want to stress it is NOT the primers fault.In the beginning it seemed like it did. But after 30 minutes the primer became shiny and would ooze down the wood. This has never, ever happened to me before. I had to stand at the ready with my paint brush at the 30 minute mark and blot the primer to avoid having a bigger mess. Obviously this took a lot of time and enter crying jag #2.
After the primer dried, paint wouldn’t adhere to the primer. It was the craziest thing. Honey Bee felt so sorry for me that he silently picked up a paintbrush and began painting. Mind you that he has never painted a piece of furniture before – that’s how bad it was. My arms hurt so badly that I could barely lift them above my head. Plus, I didn’t meet the deadline of completing the hutch to get it into the booth for the grand opening of November 1st. Yes, I cried again because at the time I was disappointed in myself, I felt like I had disappointed my friend and booth partner Darlene and I was just plain exhausted. We had to leave town November 2nd and the hutch looked like this…
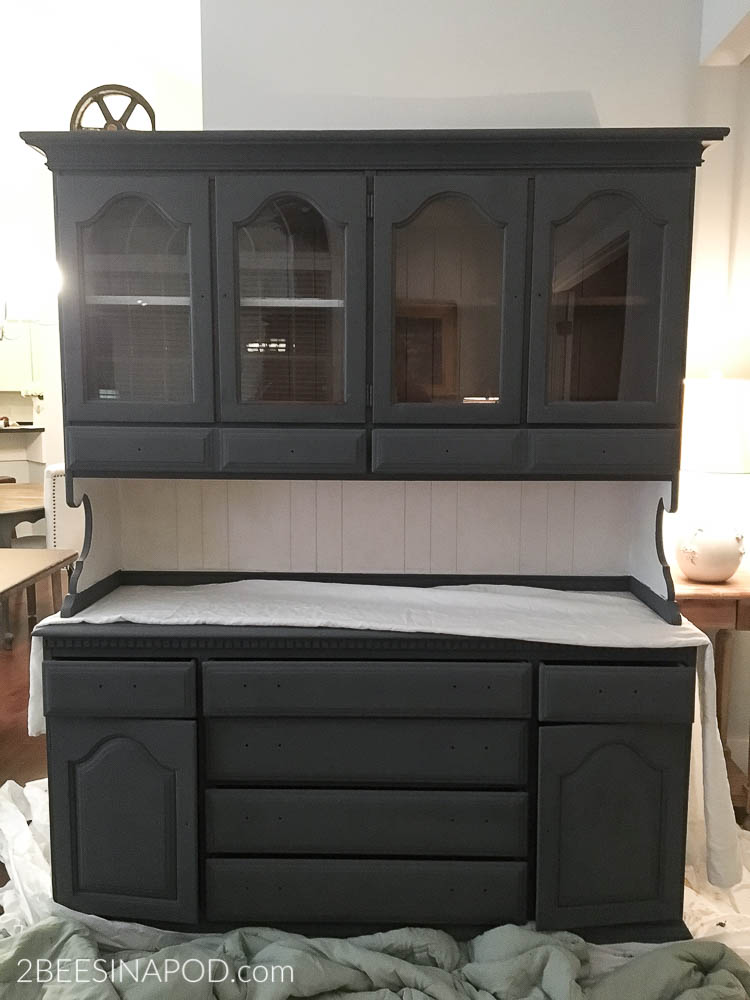
All of the white areas needed another coat of paint, the glass needed to be cleaned, clear and dark wax needed to be applied and the hardware needed to be reattached. I can’t express the heaviness I felt of leaving town knowing that this hutch was waiting for me at the front door entry on my return.
On the car ride home after our trip I was plotting revenge with a sledge hammer 🙂 But, I came to my senses and immediately got to work the next morning. The checklist was completed in quick order. Wanting this hutch out of my house ASAP I determined at the very least before I took the hutch to my booth maybe I could create a blog post from all of my hard work. Quickly I placed items on and in the hutch.
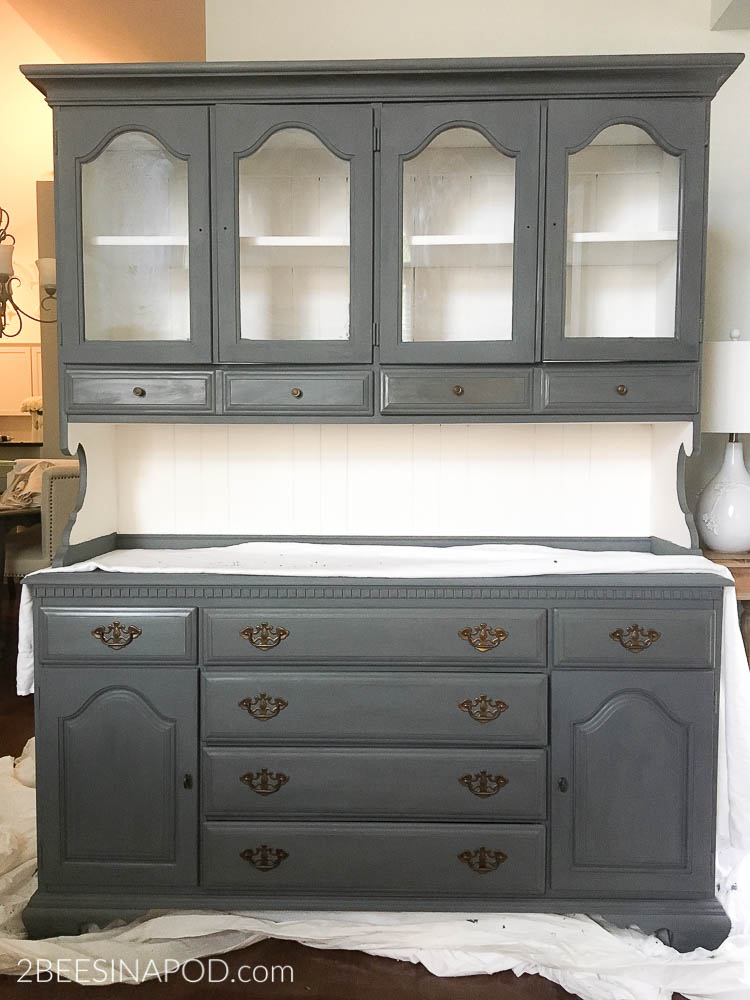
Again using my iPhone and not my good camera I stomped away to snap the photo. As I whirled around to take the pic I sucked in my breath with this Cinderella moment.
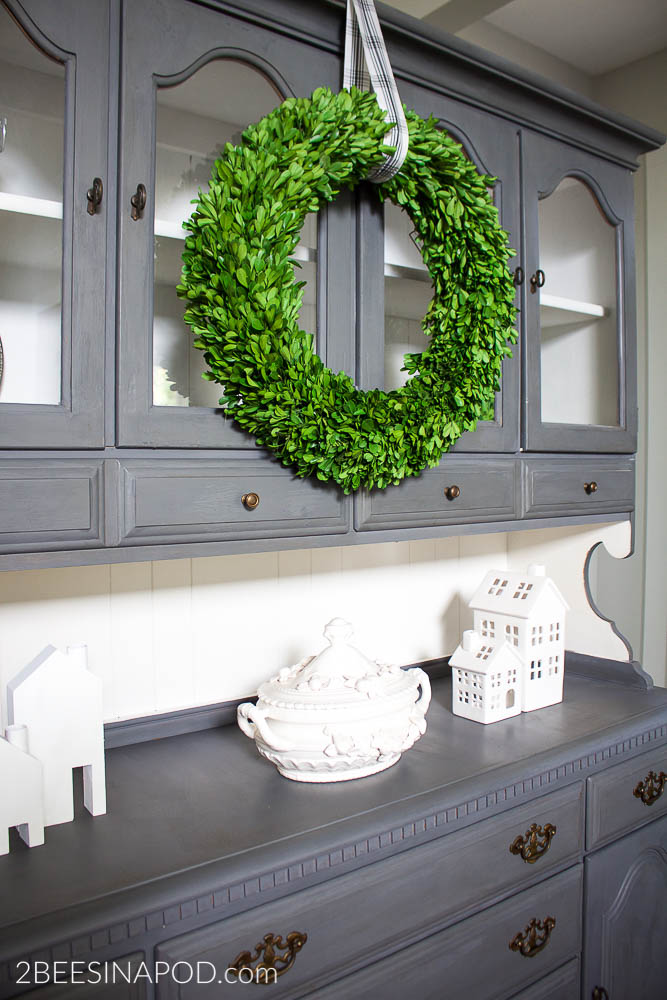
This gray painted hutch makeover that I cried over, cursed over and shook my fist in the air at.
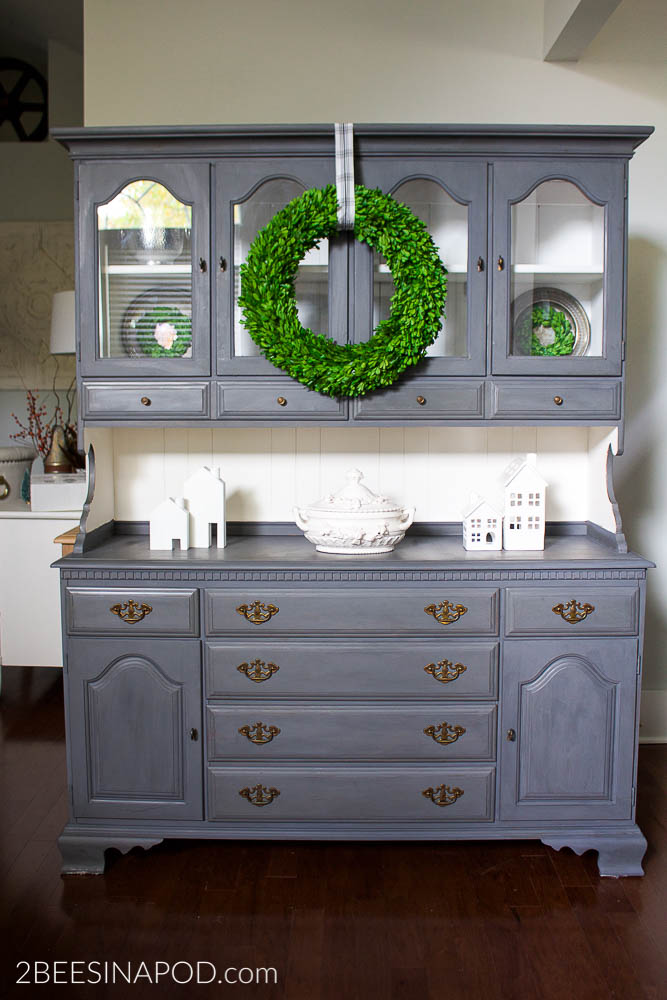
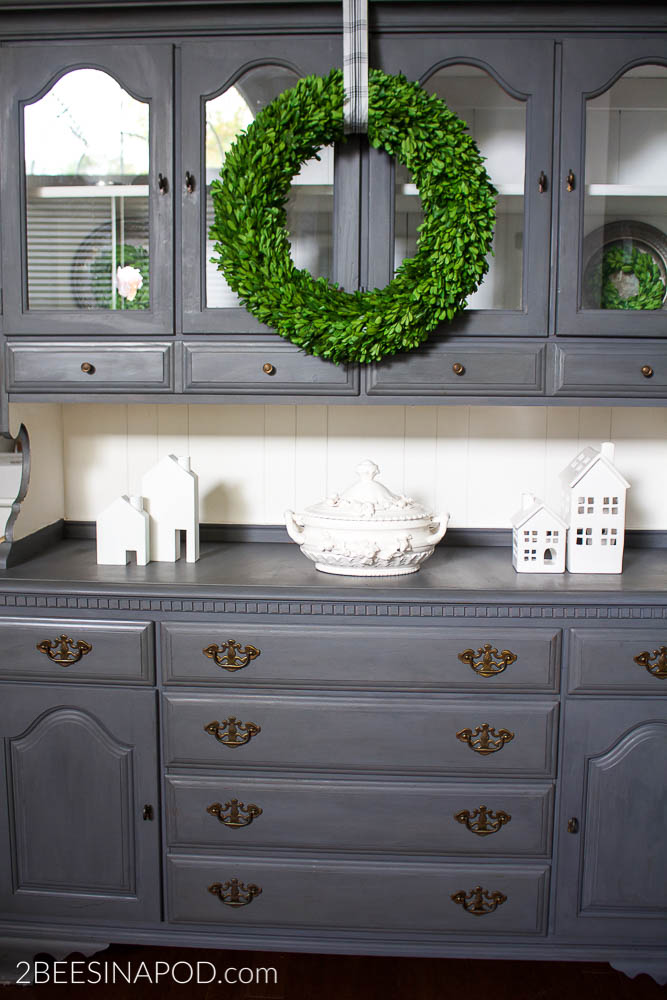
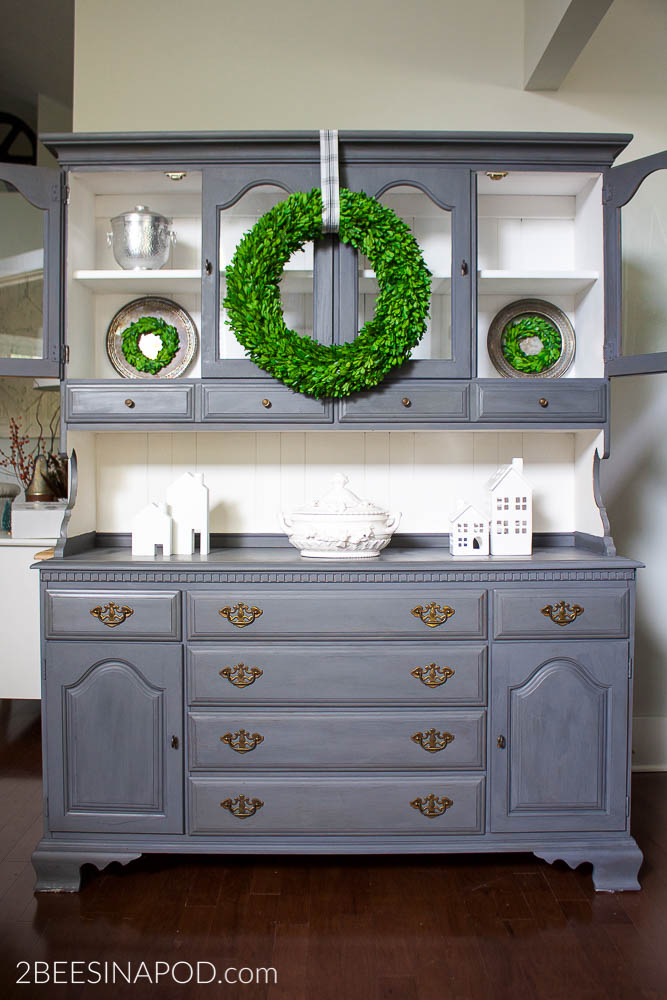
Because I fell in love.

Surprisingly I forgot about all of the heartache, pain and frustration this hutch caused me. I fell in love with the lines, detail trim, size, color, hardware and storage options.
So in love in fact that the hutch never went to my booth! She has a forever home in my house. Can you believe it? Me either! After all that she put me through. I moved a few things around in the house and she looks beautiful right where she is!. You will be seeing more and more of her in the future.
Open our FREE guide for all of the painting tips that you could need!
Don’t forget to Pin this to your favorite Pinterest board!
Until Monday where will be sharing lots of details about mantels and how to decorate them!

This is stunning! I am so inspired, I’m new to your blog. My niece just bought a new home and can’t afford much in the way of furniture-I can’t wait to show her this-on the way to the thrift store!
Hi Sandra! We are so excited that you are here at 2 Bees!Thrifting and painting furniture are two of our favorite things to do. This hutch is not a typical experience at all…painting is usually much easier. Happy hunting at the thrift store. We would love a report back at what you find!
Vicki and Jenn~
What a nightmare painting this thing but it’s absolutely gorgeous, Vicki! I’m glad you decided to keep it!
Hey Amy – so good to hear from you! OMG, you have no idea! I have never ever worked so hard on a piece of furniture. No one was more surprised than me that I kept it for my home. My husband couldn’t believe it either LOL. Cheers to a wonderful New Year!
I fell in love with it also!! I know I would never sell it!
Oh my gosh, this is GORGEOUS! I know she gave you some trouble and I’m so proud of you for sticking with it. I love the color so much too. I didn’t even know paint/orange stain could do that to Zinsser, it’s always a sure thing but I appreciate you showing that part in case we have the same issue come up. When you see a pretty piece at a good price you gotta grab it. Love, love, love this transformation! Hugs, CoCo PS: Super excited you’re keeping it!
It’s a beauty! But, I’m very curious to find out what the deal on the top was? Have you asked anyone about the orange-y cleaning cloths & why the paint wouldn’t stick on the primer? I’ve never heard of this before. Did the piece have a furniture maker’s name ? I like a good mystery! Thanks
Hey Mary – Thank you so much! It was definitely a LOT of work to get it to the beauty point LOL. We truly have no idea – especially since there was no issue at all with the bottom portion of the hutch. The furniture was made by Bassett in the 1950’s. The two pieces definitely match and go together. We don’t know if they were stored separately or differently in some way. This is definitely a mystery!
We appreciate your interest. If you have any ideas, we would love to hear them!
Vicki and Jenn
I love that your home is always in transition. It’s wonderful to see someone out there is a lot like me. I’m currently in the mental stages of giving my master bedroom a face lift. Worried black and white would make the room smaller but what you have done is beautiful. The room doesn’t look too dark or uncomfortable…quite the opposite. What a gorgeous painted makeover. just love everything about it !
Amazing transformation! I’m just sorry it made you cry and almost got the best of you!
Thanks so very much Debra! In the end, it was totally worth the tears and hard work! We love the hutch and so glad that we decided to keep her.
Your tears turned to forever joy! What a beautiful transformation. Well done!
Thank you so very much Laura! It was definitely touch-and-go for awhile there. It goes to show that patience definitely pays off.
We appreciate you following along.
Jenn and Vicki
Beautiful!! I’m wondering if the top piece was kept around cigarette smokers. I’ve cleaned pieces around smokers, the nicotine removal was very challenging.. good job, sorry for the tears
Wow Roxann – you might be right! Thank you so much for that great suggestion. We too have painted a lot of furniture over the years and have never seen anything like this…and hopefully never will again LOL. We appreciate you following along and taking the time to write this idea.
All the best,
Vicki and Jenn
The gray hutch is absolutely beautiful & such an inspiration for me!!! I need to start painting a few pieces that I have. I painted a small table for my daughter years ago when she was in colkege, but chalk paint wasn’t around at that time. Thanks for sharing all your tips!
The color turned out to absolutely beautiful! What a wonderful job that you did! It is nothing like a good old furniture refresh!
As I was looking for ideas to paint my red buffet, I came across your hutch makeover. I love the color. Do you remember the name of the gray you used? Im so glad it turned out for you. What a challenge!
Thanks.
Laura Harper
My husband got his mother’s oak hutch. It’s out dated and I need to do something with it. Would love to do something like this with it. Yours looks so beautiful! My home is modern farmhouse . Grey, cream and beige Colors. Do you think doing the hutch in soft grey would work?
Hello I’m so excited I just bought almost the exact hutch. I can’t wait to paint it I’m an Annie Sloan girl could you tell me the colors names you used I’ve used the graphite many times and your piece looks a bit lighter.
Thank you
LOVE the painted hutch! I just bought a $50 hutch and was pondering what I could do to help it fit with out gray/white kitchen. Bingo! I’m new to your site, so can you tell me if the specific materials and methods are discussed in depth somewhere? I haven’t been able to find the details and this makeover is perfect! Thanks. Kat ([email protected])
Can u tell me what color you used? That grey/blue is exactly what I’m aiming for in a project!
Hello! I am looking to do my first project. I love the color of the hutch. What colors did you use? Plus the clear and dark wax correct? Thanks so much in advance.
I purchased a large thrift store hutch ($65) and want to make it gray and white but I hesitated. This is perfect and I am going to move forward with it soon 🙂
I really love the color! Would love to know where to get it, brand and color..
Thank you!!
Beautiful work! Im just wondering, how did you remove the wavy piece of wood that was under the shelf? Did you just pull it off or did you have to use a saw? I have a similar hutch that I would like to do this to.
Thanks!
Thanks so very much!
The wavy, decorative piece of wood on the hutch was held together with a screw. It was easy to remove and we saved the piece for another project.
Best wishes on your hutch makeover. We’d love to see a photo when it’s complete!
Vicki and Jenn ~ 2 Bees
Did you paint the bottom interior and if so, what color? Thank you!
This looks beautiful. I love the blue-gray color. What is it called? Thank you!