How to Make Skeleton Leaves…
Please note that this post contains affiliate links. As an Amazon Associate, Rewards Style influencer and Jane Influencer, we earn from qualifying purchases and any sales made through such links will reward us a small commission – at no extra cost for you.
Today, I wanted to share with y’all how to make skeleton leaves. When I was about 12 years old, I got to visit my grandparents for two weeks. During this particular visit grandma and grandpa took me on a picnic lunch at an isolated spot on the St. John’s River. While exploring I found a pretty leaf that I wanted to keep but wasn’t sure how I would get my treasure home.
Once back at the house my grandfather handed me a bible and told me to put the leaf in the middle of it. He told me that I shouldn’t disturb the leaf by taking it out and looking at it. Grandpa told me I would be surprised at what would happen over time, if I were patient. This is that leaf today:

I love that I still have this leaf, bible and wonderful memory and am afraid to move the leaf or display it in a frame – for now it will stay in my bible unless you have a suggestion for me. Definitely am open to any solutions that you offer.
I became curious if there were a quicker process to skeletonize leaves without having to wait for years for nature to take its course. After doing research online that became more and more contradictory and confusing. I decided to throw caution to the wind as I like to do 🙂 and decided to do it this way:
I purchased Super Washing Soda…

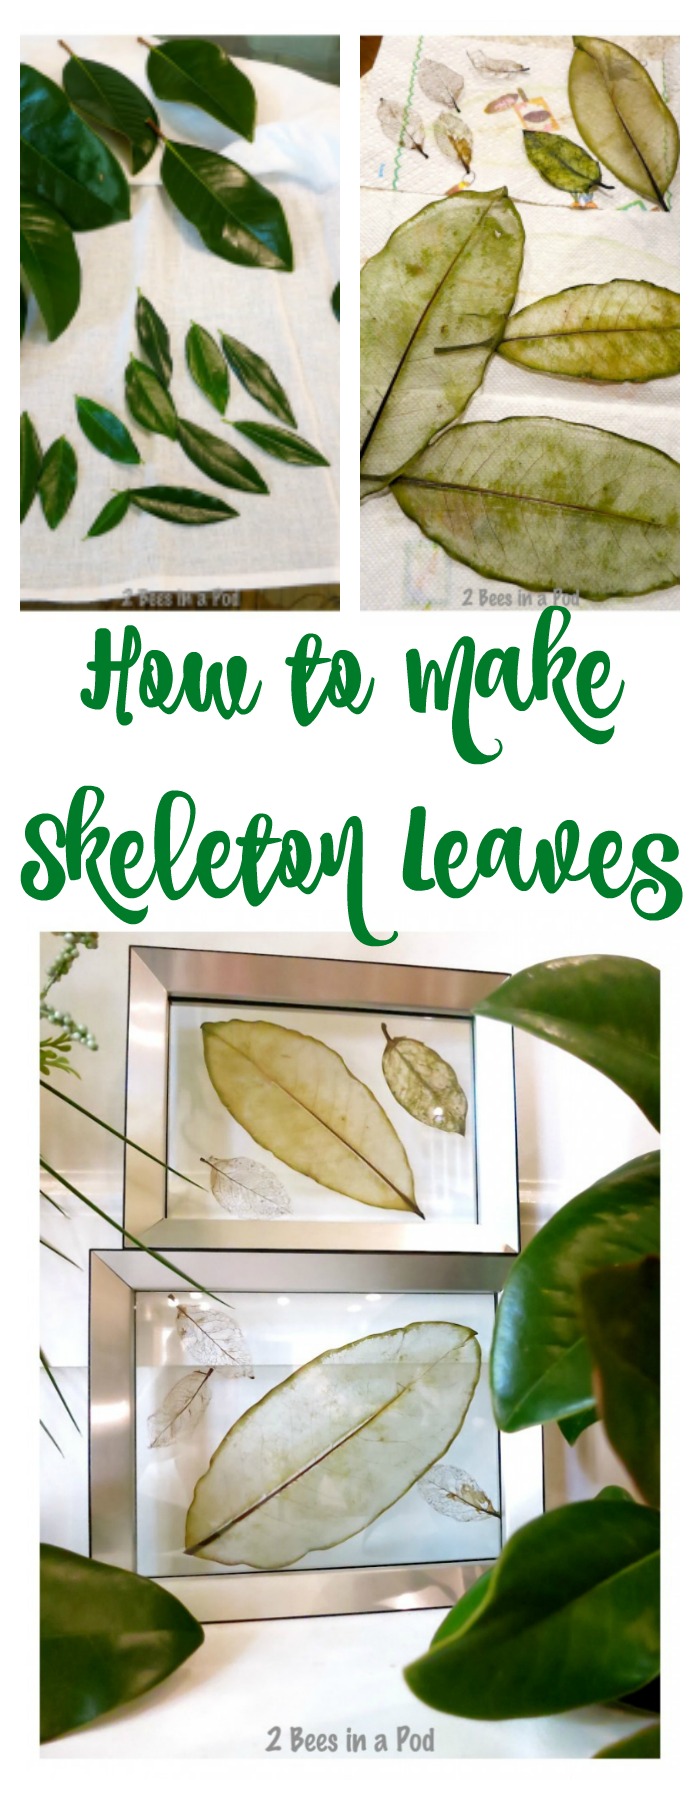
I collected this variety of leaves as i wasn’t sure which ones would work. The leaves I used were magnolia, maple, camellia, galaxy and holly. I snipped them right off of the trees and bushes.

I placed the leaves in a large pot with 8 cups of water and 1 1/2 cups of washing soda wash. You may need to add water to your pot as it evaporates when boiling.
I did a test check after one hour – none of the leaves were ready. After two hours this is what the pot looked like – Yuck!

I placed the leaves in a cool water bath.

And used an old toothbrush to remove the waxy outer layer – this came off very smoothly.

Then rinsed them off under cool water and scrubbed off the outer layers until the skeleton of the leaf started to show through.

The magnolia leaves were the hardiest and most forgiving. I was also able to use holly and camellia leaves. All of the others disintegrated 🙁

I found these perfect frames at Hobby Lobby – 50% off. Double sided glass makes them perfect for displaying the leaves.

In a frame…

…ready to be displayed. I love looking at the intricate veining – amazed that a leaf has an interior skeleton.

The leaves that survived the boil are not delicate at all. The magnolia leaves feel like artificial fabric. For now they are displayed on my fireplace mantel but with the double-sided glass I can move them around and use in different rooms.
Thanks for letting me share this fun and easy project…and a wonderful childhood memory.

Such a great idea! You two always have the coolest craft projects! Thanks for sharing!
I’ve never heard of doing anything like this! I really love the way they turned out!
I was looking for leaves to do this with while on my walk tonight 🙂 Love this idea of using botanicals in a modern way that still works with a vintage vibe. Good mix 2 Bees! Bwg ~~~